 Here are the simple steps in doing photo manipulation:
 Step 1:
- Simply choose two images from your file that you want to use for manipulation. (Just like the 2 images on this tutorial. "Shrek and Glenn")
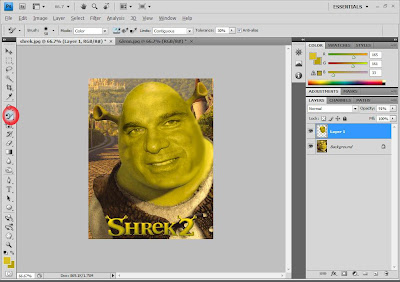
 - When you are done choosing 2 images or dragged them on your photoshop screen. Choose "Lasso Tool" icon that is found on the upper left side of the screen.
- And then choose a part or an area that will be used in manipulation. For example, on this tutorial, we will use the face of Glenn and make it into a Shrek look a like. :)
In choosing the specified area, just simply use your "mouse" and then "left" click.
- When you're done, choose "move" icon that is located at the top left of the photoshop screen. And simply drag it into the other image.
Step 4:
- And then simply adjust it by pressing "Ctrl T" on your keyboard. This was taught from the previous tutorials.
- When you are done adjusting and it fitted perfectly, you can now adjust the color by choosing "Color Replacement Tool" icon that is encircled on this image. And then press "Alt" by choosing color from that image that you like to replace on that part. And your done. :)
It is very simple though, for the first timers you have to review on the previous tutorials. :) Hope you enjoy! Watch out for more tutorials to be posted.


2 comments:
Hello PS Master, ur blog is really nice and eyecatching as well as u have a good talent,I truly like it.I just wanna suggest that u should go for blog advertising & marketing there is a website which is offering very unique features at affordable prices. There are Expert advertising teams who will promote ur blog & affiliate ads through all over the networks. All u have to do is submit your blog plus pay affordable prices and rest leave it to Advertising Team for Promotion & Marketing .I too have submitted my blog in it & getting a good response from it . Finally I have bookmarked ur blog & also shared with my friends hope u have a wonderful day & !!happy blogging!!.
hehehe. what a funny photo manipulation. anyways need photo manipulation service follow us
Post a Comment