 There are lot of great tools in doing some special effects into our image, one of this is using the gradient tool in photoshop. Here are the simple steps in doing so:
Step 1:
-Drag or open an image from your file to your photoshop.

Step 2:
-Go to "Adjustments" tab, located at the right side of your screen, and choose the "Gradient Map" icon, (encircled on this image.)
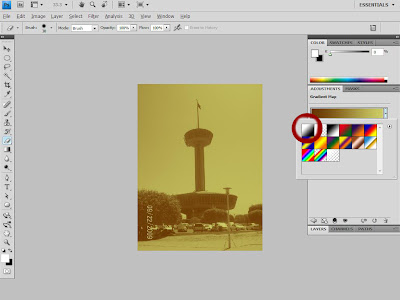
-Go to "Adjustments" tab, located at the right side of your screen, and choose the "Gradient Map" icon, (encircled on this image.)

Step 3:
-You can choose any colors you like. In this tutorial we will just use the black and white gradient.
(encircled on this image.)
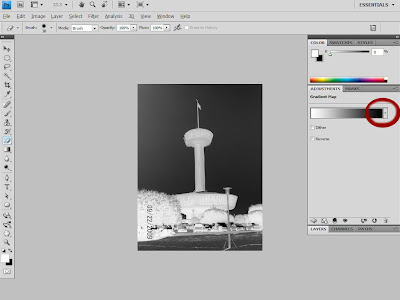
-You can choose any colors you like. In this tutorial we will just use the black and white gradient.
(encircled on this image.)

Step 4:
-After you have chosen your gradient color. You can also choose some special effects colors by just clicking the "down" arrow. (encircled on this image.)
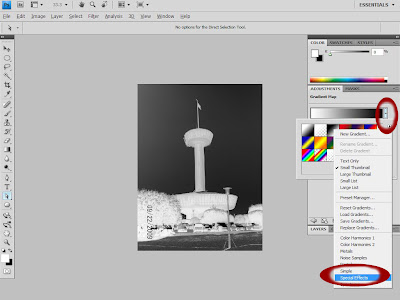
-After you have chosen your gradient color. You can also choose some special effects colors by just clicking the "down" arrow. (encircled on this image.)

Step 5:
-And simply choose "Special Effects" located below the tab. (encircled on this image.)
 -And simply choose any effect you like :)..
Very simple isn't it? :) Watch out for more simple tutorials to be posted. Thank you.
-And simply choose "Special Effects" located below the tab. (encircled on this image.)
 -And simply choose any effect you like :)..
Very simple isn't it? :) Watch out for more simple tutorials to be posted. Thank you.


6 comments:
informative information with pic
Very informative tutorial. Thanks for sharing.
Regards,
photoshop restoration and retouching
linked you in my site, check it out, hope you can add me too.
Gosh I really need to learn photoshop.
So useful.
I like the result, your tutorial is so clear...
That was quite helpfull,Ty amgone try it out !
Post a Comment