Showing posts with label manipulation. Show all posts

Diffusing Glow Effect

8 comments
Here are the simple steps in creating some effects through photoshop:
Diffusing Glow Effect

Step 1:

- Simply open or drag an image from your file into your photoshop screen and then choose the "filter" tab located at the top part of the screen.


Step 2:

- As you can see, there are lot of options you can choose from. On this tutorial, we will just choose "Distort" and then "Diffuse Glow". It's up to you what effects you would like to have.


Step 3:

- When you are done choosing an effect just simply press the "OK" button. :)


As simple as that you can enjoy creating an effect on your images.. :)

Watch out for more tutorials to be
posted. :) Have a good day!

How to Flip an Image

2 comments
Here's a very simple tutorial on how to flip an image through photoshop:


Step 1:

- Open, choose or drag an image into your photoshop screen.


Step 2:

- Click the "Image" button located at the top of your screen. And simply choose "Image Rotation".


Step 3:

- After choosing the image rotation, you can either flip the image horizontally or vertically. In this tutorial, I just use the "horizontal" flipping. And you're done. :)


Very simple isn't it? Watch out for more tutorial to be posted. Thank you for visiting. :)


How to Put Text on an Image

5 comments

Here are the simple steps in how to put text on an image:


Step 1:

- Open or drag an image on your photoshop screen. And simply choose the "Text" icon located at the left of your screen. (encircled on this image)


Step 2:

- Just highlight the location that you want to place the text or the word. For example, on this image, it was highlighted above.


Step 3:

- And then, you can adjust the font size by just clicking the "font size" icon located at the top of the screen. And if you want to change the text color, just click the color box and choose the color that you want. (encircled on this image)


Step 4:

- If you want to change the font face or the lettering. Simply click the down arrow encircled on this image.


Step 5:

- And you can write whatever you want. After writing just click the "Layer text" located at the right side of your screen. (encircled on this image) And you're done! :)

Very simple! Hope you learn something from it. Watch for more tutorials to be posted.


Gradient Special Effects

6 comments
There are lot of great tools in doing some special effects into our image, one of this is using the gradient tool in photoshop. Here are the simple steps in doing so:

Step 1:

-Drag or open an image from your file to your photoshop.


Step 2:

-Go to "Adjustments" tab, located at the right side of your screen, and choose the "Gradient Map" icon, (encircled on this image.)


Step 3:


-You can choose any colors you like. In this tutorial we will just use the black and white gradient.
(encircled on this image.)


Step 4:


-After you have chosen your gradient color. You can also choose some special effects colors by just clicking the "down" arrow. (encircled on this image.)


Step 5:


-And simply choose "Special Effects" located below the tab. (encircled on this image.)

-And simply choose any effect you like :)..


Very simple isn't it? :) Watch out for more simple tutorials to be posted. Thank you.

How To Make Black and White Image

9 comments

Here are the simple steps in making black and white image:

Step 1:

-Open or drag an image to your photoshop screen.
-And choose "Adjustments" tab located right side of your screen.


Step 2:

-Choose the "Black and White" icon found in the adjustment tab. (encircled on this image)


Step 3:

-You have now your black and white image, however, you can still adjust the contrast and brightness if you like. :)


Very simple. :) Watch out for more tutorials to be posted.. Thank you guys.

How To Make Transparent Background

0 comments


Here are the simple steps in making a transparent background:

Step 1:

- Open or drag an image into your photoshop screen.


Step 2:

-And begin clipping the image, that was thought from previous tutorials. (For first timers CLICK HERE)


Step 3:

- Make a selection, by just pressing right click on the path, encircled on this image. (If you didn't get it on how to CLICK HERE)


Step 4:

-Go to the "layer" tab and double click the bar encircled on this image to make it "layer 0".


Step 5:

-And then press the "Layer Mask" icon, located at the lower right corner on your screen.


As simple as that.. :) Please watch out for more tutorials to be posted.

How To Adjust Brightness Using Curves

0 comments

Here are the simple steps in adjusting brightness of an image using curves:

Step 1:
-Open or drag the image you want to adjust into your photoshop screen.
-On the right side of your screen, choose the "Adjustments" tab.
-On the adjustments tab, there are many of options you can choose from.
(Let's just use the "curves")


Step 2:

-If you like to adjust it directly, you can use the "Auto" button found in the upper right corner of the curve's section.


Step 3:

-If you are satisfied of the "Auto" adjustments, you can adjust it by yourself, by just dragging or sliding the line on the bar up and down.. :)

Very simple isn't it? :)
Watch out for more tutorials to be posted..

Background Manipulation

4 comments
Here are the steps in photo editing for background manipulation:

Step 1:

-Choose 2 images from your files, for example on this tutorial, a nice background and a person. Simply drag it to your photoshop screen.


Step 2:

- Clip the image of the person,
(for first timers, please click here for clipping path tutorial.)


Step 3:

- And when you are done clipping the image, you have to make a selection like we did on the previous tutorial, click here.


Step 4:

-When you already make a selection. Choose the "Move tool" icon that is located on the upper left corner on the sidebar of your screen. And drag the image to the second photo and that is the background. For example, the beach.


Step 5:

- You can adjust the image size by pressing "Ctrl + T" and by adjusting the image color press "Ctrl + U" on your keyboard.

- To make it more realistic "blur" the edges of the clipped image by using the "Blur tool" icon. And for the shadow you can just brush it by using "Brush tool". (encircled with RED on this image. )
(Note: this will be posted on the next tutorial.)

Body Resizing through Photoshop

1 comments

Step 1:

- Drag an image you want to edit in photoshop. Then choose "Filter" button found in the upper part portion.


Step 2:

- On the filter tab choose "Liquify" option.

- Or simply press "Shift+Ctrl+X" on your keyboard.


Step 3:
- A new table will appear and choose the "Forward Warp Tool", found in the upper left corner.

- And on the right side, you will see "Tool Options" for the brush size, density and pressure. Adjust it to where you are comfortable.

- Resize the part of the image you want to edit.


Step 4:
- After you are done resizing. You can "shrink" the other part to make it more realistic.

- For example here, the shoulder part. You can shrink that part by using "Pucker Tool", found in the 4th button from the top left.

- When you are done editing, Press "OK", found in the upper right corner.


Step 5:

- "Shift+Ctrl+S" to Save. :)


Thank you for visiting! More tutorials to be posted.. :)

Colorizing Technique

0 comments
Here's the step by step process in changing the colors through photoshop:

Step 1:

- Simply drag an image to the photoshop


Step 2:

- Select "Default" menu found at the lower left corner on your photoshop.

- Then select "brush tool" and simply highlight the part that you want to change. For example the red part of this photo.


Step 3:

- After you highlight the part, simply press "Q" button on your keyboard.

- Then click the "SELECT" button, then "INVERSE" that is found in the upper part of the photoshop. Or simply press "Shift+Ctrl+I" on your keyboard.


Step 4:

- Then press "CTRL U" on your keyboard and you will find a small box, then check the "colorize" button.

- And simply you can choose or adjust any color that you want.

Thank you. I hope that this will help you. Enjoy!

Photoshop CS4

1 comments

The Introduction:

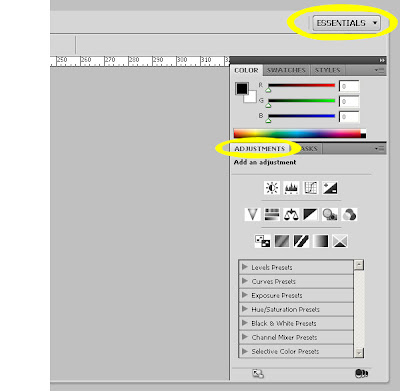
Photoshop CS4 introduces a new Panel to make photo editing easier. And that is the Adjustments Panel, it is a quick and accurate way to edit any images by simply clicking on one of the Adjustment options shown on it.


You will be able to edit the colors, saturation, levels, channels, mix colors, add gradients, etc. . You'll be able to easily change the adjustment settings, hide/show a specific adjustment layer, quickly add clipping masks in order to apply an Adjustment to a single layer or several layers depending on your needs, and much more. This will help us, for any user level to better understand this new tool.


Copyright 2009 Photoshop Master
BloggerTheme by BloggerThemes | Design by 9thsphere